Navigation
On flutter we already have a powerful navigation system based on stacks, that's why we decided to add new functions without losing the compatibility with the new version of SDK. Therefore, commands like pushNamed, popUntil among others were preserved.
Using Modular.to.navigate()
The flutter_modular adds the command navigate to look similar to the web environment by replacing all the pages for the requested one. Let’s add one more ChildRoute to our initial project:
import 'package:flutter/material.dart';
import 'package:flutter_modular/flutter_modular.dart';
void main() {
return runApp(ModularApp(module: AppModule(), child: AppWidget()));
}
class AppWidget extends StatelessWidget {
Widget build(BuildContext context) {
return MaterialApp.router(
title: 'My Smart App',
theme: ThemeData(primarySwatch: Colors.blue),
routerConfig: Modular.routerConfig,
); //added by extension
}
}
class AppModule extends Module {
void binds(i) {}
void routes(r) {
r.child('/', child: (context) => HomePage());
r.child('/second', child: (context) => SecondPage());
}
}
class HomePage extends StatelessWidget {
Widget build(BuildContext context) {
return Scaffold(
appBar: AppBar(title: Text('Home Page')),
body: Center(
child: ElevatedButton(
onPressed: () => Modular.to.navigate('/second'),
child: Text('Navigate to Second Page'),
),
),
);
}
}
class SecondPage extends StatelessWidget {
Widget build(BuildContext context) {
return Scaffold(
appBar: AppBar(title: Text('Second Page')),
body: Center(
child: ElevatedButton(
onPressed: () => Modular.to.navigate('/'),
child: Text('Back to Home'),
),
),
);
}
}
We used the Modular.to.navigate() for a direct navigation with no bonds, so all previous routes will be destroyed.
In case you want to keep the previous routes, do not use the Modular.to.navigate and instead use Modular.to.pushNamed, so you can use Modular.to.pop to return to the previous route.
Passing parameters
It's common that we want to send data as parameters to another page. The flutter_modular offers some ways to do this:
- Dynamic routes: consists on having a dynamic route segment, can be retrieved as a parameter:
ChildRoute('/second/:name', child: (_) => SecondPage(name: r.args.params['name'])),
Adding a second segment to the route’s name starting with :. This is a special syntax to
indicate that the route now matches any value in that part of the segment, and this value will
be considered a parameter and can be retrieved using Modular.args;
Modular.to.navigate('/second/jacob');  // args.params['name'] -> 'jacob'
Modular.to.navigate('/second/sara');   // args.params['name'] -> 'sara'
Modular.to.navigate('/second/rie');    // args.params['name'] -> 'rie'
Use :parameter_name syntax to provide a parameter in your route.
Route arguments will be available through args, and can be accessed in params property,
using square brackets notation (['parameter_name']).
- Query: like the web environment, we can send parameters using query. This doesn't allows you to let the route dynamic, but it has the same effect when recovering a parameter;
ChildRoute('/second', child: (_) => SecondPage(name: r.args.queryParams['name'])),
Note that the route name is the same, so we can use Modular.args.queryParams to get the parameter. Let’s see how we can navigate using queries: ∂
Modular.to.navigate('/second?name=jacob');  // args.queryParams['name'] -> 'jacob'
Modular.to.navigate('/second?name=sara');   // args.queryParams['name'] -> 'sara'
Modular.to.navigate('/second?name=rie');    // args.queryParams['name'] -> 'rie'
We can continue the query separating by & like on web, for example: /second?name=jacob&lastname=moura.
- Direct arguments: Sometimes, we need to send a complex object and not only a String as parameter. So we send the whole object directly in the navigation:
class Person {}

// Use Modular.args.data to receive directly argument.
ChildRoute('/second', child: (_) => SecondPage(person: r.args.data)),

// Send object
Modular.to.navigate('/second', arguments: Person());
Adding transitions
When we navigate from one screen to another, we experienced a standard screen transition, but we have the possibility to use some pre-settled transitions or create a fully customized.
Both ChildRoute and ModuleRoute have the Transition property, which receives an enum with animations. The available animations are:
TransitionType.defaultTransition,
TransitionType.fadeIn,
TransitionType.noTransition,
TransitionType.rightToLeft,
TransitionType.leftToRight,
TransitionType.upToDown,
TransitionType.downToUp,
TransitionType.scale,
TransitionType.rotate,
TransitionType.size,
TransitionType.rightToLeftWithFade,
TransitionType.leftToRightWithFade,
TransitionType.custom,
Choose the one you want and add the Transition property of an ModularRoute:
ChildRoute('/second', child: (context) => SecondPage(), transition: TransitionType.fadeIn),
You can also decrease or increase the transition duration by adding the property duration;
If no preset is useful, we can create a custom transition using the CustomTransition():
ChildRoute(
  '/second',
  child: (_) => SecondPage(),
  transition: TransitionType.custom,
  customTransition: CustomTransition(
    transitionBuilder: (context, anim1, anim2, child) {
      return FadeTransition(
        opacity: anim1,
        child: child,
      );
    },
  ),
),
RedirectRoute
If is necessary to define a route for redirection, you can use RedirectRoute as a route:
List<ModularRoute> get routes => [
ChildRoute('/', child: (_) => HomePage()),
RedirectRoute('/redirect', to: '/'),
];
RedirectRoute is very useful to work as a shortcut for long routes.
WildcardRoute
When a route is not found, an error is sent informing that the route path does not exist. Although we can add a behavior when no route is found in the module. We call this route WildcardRoute:
WildcardRoute(child: (context) => NotFoundPage()),
Have only one WildcardRoute per module and, if possible, let it be the last element.
Route guard
Some pages may contain information that cannot be accessible to all application users and, like a web app, the user can type a restricted url. To solve this problem we must implement a RouteGuard.
The ChildRoute can receive one or more route guards that intercept and execute a decision code before the page is launched. From a RouteGuard we can restrict access to the route or redirect the request to another page. Let’s see how to create a RouteGuard:
class AuthGuard extends RouteGuard {
AuthGuard() : super(redirectTo: '/login');
Future<bool> canActivate(String path, ModularRoute router) {
return Modular.get<AuthStore>().isLogged;
}
}
To use a guard just add it to a route:
ChildRoute('/', child: (_) => HomePage(), guards: [AuthGuard()]),
Setting redirection is not an obligation, but if not, an error will be raised.
Always use Modular.get() inside the canActivate method.
RouterOutlet
Until now, we used a global Navigation and in most cases only one will be enough. But there are contexts that we will need another nested browser. For that we use RouterOutlet.
Each ChildRoute is entitled to a RouterOutlet for its children, and we can add it anywhere in the Widgets tree, once the RouterOutlet is also a widget. For example:
import 'package:flutter/material.dart';
import 'package:flutter_modular/flutter_modular.dart';
void main() {
return runApp(ModularApp(module: AppModule(), child: AppWidget()));
}
class AppWidget extends StatelessWidget {
Widget build(BuildContext context) {
Modular.setInitialRoute('/page1');
return MaterialApp.router(
title: 'My Smart App',
theme: ThemeData(primarySwatch: Colors.blue),
routerConfig: Modular.routerConfig,
);
}
}
class AppModule extends Module {
void binds(i) {}
void routes(r) {
r.child('/', child: (context) => HomePage(), children: [
ChildRoute('/page1', child: (context) => InternalPage(title: 'page 1', color: Colors.red)),
ChildRoute('/page2', child: (context) => InternalPage(title: 'page 2', color: Colors.amber)),
ChildRoute('/page3', child: (context) => InternalPage(title: 'page 3', color: Colors.green)),
]);
}
}
class HomePage extends StatelessWidget {
Widget build(BuildContext context) {
final leading = SizedBox(
width: MediaQuery.of(context).size.width * 0.3,
child: Column(
children: [
ListTile(
title: Text('Page 1'),
onTap: () => Modular.to.navigate('/page1'),
),
ListTile(
title: Text('Page 2'),
onTap: () => Modular.to.navigate('/page2'),
),
ListTile(
title: Text('Page 3'),
onTap: () => Modular.to.navigate('/page3'),
),
],
),
);
return Scaffold(
appBar: AppBar(title: Text('Home Page')),
body: Row(
children: [
leading,
Container(width: 2, color: Colors.black45),
Expanded(child: RouterOutlet()),
],
),
);
}
}
class InternalPage extends StatelessWidget {
final String title;
final Color color;
const InternalPage({Key? key, required this.title, required this.color}) : super(key: key);
Widget build(BuildContext context) {
return Material(
color: color,
child: Center(child: Text(title)),
);
}
}
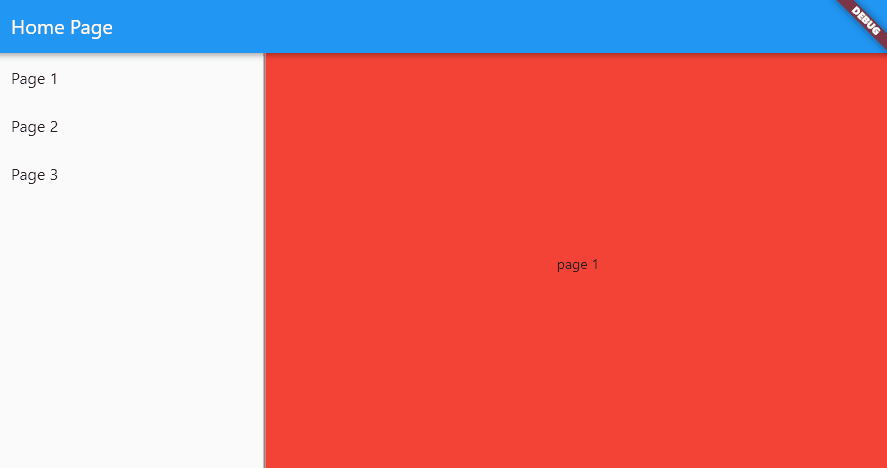
The result will be:
The RouterOutlet is a nested navigation, so there is no page caching.
A ChildRoute named as / cannot have a child /. It is necessary to use better naming convention
for its child routes.
Getting Navigation History
You could get the navigation history anywhere by using Modular.to.navigateHistory. For example:
class NavigatorHelper {
  String getFirstRouteHistory(String path) {
    var history = Modular.to.navigateHistory;

    return history.first.name;
  }
}